


Django Test Driven Development using Bitbucket


Big IT companies have seen the need of testing as a major step in software development and emphasize on testing of software thoroughly before shipping them out.
Assuming you made a smoke detector alarm that triggers an alarm once it detects smoke, you cannot just start selling it directly or install it in your house waiting for the day you house catches fire to find out whether it works. You have to test its functionality. To make it simple, you would make two tests. One, ensure the alarm is not triggered when there is no smoke therefore raising false alarms. Two, ensure the alarm is triggered when there is smoke.
Just like the smoke detector, you cannot deploy a software to production without testing. According to me, undergraduate computer science courses hasten students to learn new programming languages every semester and don’t utilize enough time to teach them about software testing.
In this blog, we will emphasize on Test Driven Development (TDD) with Django and Continuous Development- Continuous Integration (CD-CI) with Bitbucket. So hop into the ship in two parts:
PART 1: Test Driven Development With Django
As websites grow they become harder to test manually. There is this old saying by Andrea Koutifaris “All code is guilty until proven innocent”. Test-driven development is a process of modifying the code in order to pass a test designed previously. Just like the smoke detector alarm analogy, we write deliberately failing test cases, we will also write application code to make the test cases pass.
For demonstration purposes, we will use this repo a simple Django user authentication project. Otherwise, you are free to implement this project template in your applications.
Step 1: Cloning the repo
To clone the repo, paste this command in your terminal:
git clone https://BriaNjoroge@bitbucket.org/BriaNjoroge/django-user-authentication.git
Step 2: Writing test cases
In the project folder, navigate to the core folder then to the tests folder. This is where I have written my test cases.
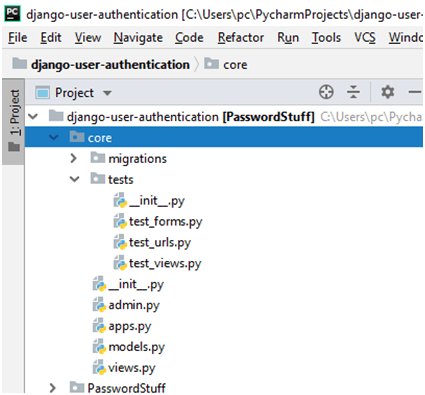
Django uses the unit test module’s built-in test discovery, which will discover tests under the current working directory in any file named with the pattern test*.py. Good rule of thumb, when doing unit tests its good to test the URLs, views, forms and models.
I have commented the code well for better understanding, its easier to explain.
Testing the URLs
https://gist.github.com/Brianjoroge/1cae1e17ee0c27bb473d02969fbc33ac.js
The code is well document but in a nutshell the file tests that the associated urls lead to their associated views function.
Testing the Views
https://gist.github.com/Brianjoroge/b249216fc0b8464cb495a5a69d2d8a50.js
Testing the Forms
https://gist.github.com/Brianjoroge/804fe2a93bc311bb1feb29325fd8edb3.js
Step 3: Running the tests
In order to run the tests, we use the command below.
python manage.py test
At the moment, the repo has only 5 test functions which all pass. After running the command, the result accepted is as:

PART 2: Continuous Integration With Bitbucket Pipelines
Linus Torvalds is a genius for having created git. Git version control system has been popular in system integrations especially when you working as a team. Many platforms have provided git services such as GitHub, Bitbucket and Gitlab. Continuous integration (CI) is the practice of automating the integration of code changes from multiple contributors into a single software project. The CI process is comprised of automatic tools that assert the new code’s correctness before integration.
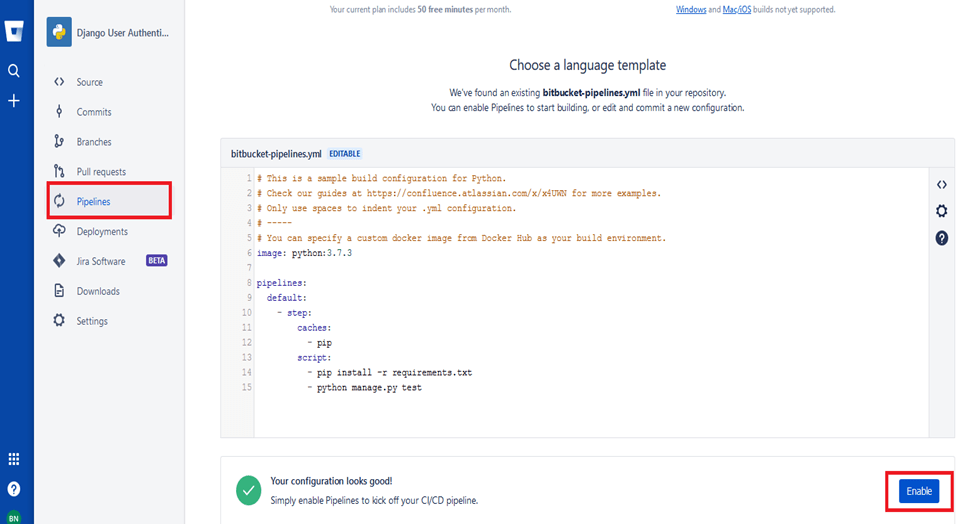
Continuous Integration has been adopted widely nowadays. Continuous Integration in GitHub can be done in collaboration with Travis CI. Bitbucket has made CI easily possible by using bitbucket pipelines. This article covers Bitbucket, if you don’t have an account with it, you can go ahead create one.
In your project root directory, create a bitbucket-pipelines.yml file and paste the code below.
https://gist.github.com/Brianjoroge/e77ab18ccabbd7b497f939d90d5c43bd.js
Line 1: Defines the python version that you would like to run your project
Line 3: Define your pipeline
Line 6: caches the pip command providing faster builds, and reducing the number of consumed build minutes.
Line 9: Install all your dependencies in the requirements
Line 10: Run the test command
Finally, after creating a remote repository on bitbucket and pushing the code, one last step is remaining that enabling Pipelines to kick off your CI/CD pipeline.
It will take some time to install the dependencies and run the command. Next time you are pushing the code, the pipeline will be run and the tests will be carried out.
This methodology is very effective. Assuming you are working on a big project where you have about 5 team members, the automatic tester doesn’t have to wait for all of you to finish the project so that he writes the test cases. In concurrency, he can be writing the test cases as the developers code. When the team pushes code using the git VCS, the tests are run and the developers can see the failed test cases and work on them pronto.
The code for this application can be found here. Till then, try this approach of TDD in software development. It may be a bargaining tool when you envisioning yourself as a senior developer.
-

By: Brian Njoroge
Brian is a junior machine learning developer ready to enter the ivy leagues. He is passionate about knowledge delivery, statistics and software technologies. He likes to stay versatile in creating machine learning models and retraining systems.
-
-
How to Convert Website to an ios/android App
Converting a Python Script to Windows Executable
CV Vs. NLP – Is it a Difficult Choice?
Data Science: A Hot Job Opportunity
Top Reasons Why You Should Choose Linux
More from my site
 Reliance Launched JioFibre preview offer in six cities including Ahmedabad, Mumbai, Delhi-NCR, Surat, Jamnagar and Vadodara
 Flipkart bends again towards Artificial Intelligence and Machine Learning: Acquires AI Startup Liv.ai
 Convert PDF Documents to Excel Spreadsheets
 Lambda Expressions with Java 8
 How to Add a New Row in a Dynamic Table in JavaScript?
 PepsiCo’s Robot for College Students – Snackbot


Leave a Reply